A dripping tap is not only annoying but can also lead to water wastage and increased utility bills if left unaddressed. Fortunately, fixing a dripping tap is a relatively straightforward task that can be accomplished with basic tools and a little know-how. In this comprehensive guide, we’ll walk you through the step-by-step process of identifying the cause of a dripping tap and implementing the necessary repairs to restore it to proper working order. Whether you’re a novice DIY enthusiast or a seasoned homeowner, mastering the art of fixing a dripping tap will save you time, money, and frustration in the long run.
Understanding the Anatomy of a Tap
Before attempting to fix a dripping tap, it’s essential to familiarize yourself with its basic components. A typical tap consists of several parts, including the handle, spout, body, valve seat, washer, and O-ring. When you turn the handle, it operates a mechanism inside the tap that controls the flow of water. Over time, wear and tear can cause these components to deteriorate, leading to leaks and drips. By understanding how each part functions and interacts with the others, you’ll be better equipped to diagnose and resolve common tap issues.
Tools and Materials Needed
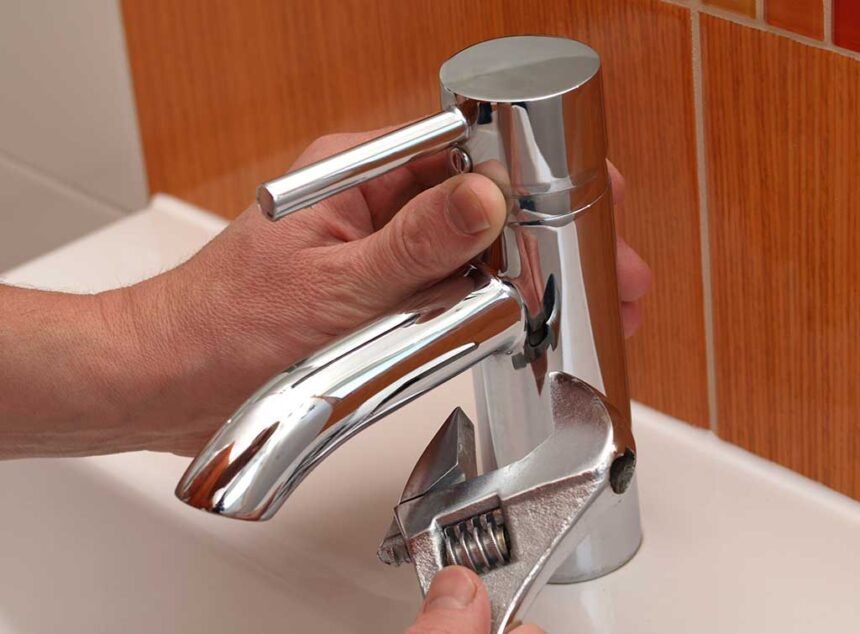
To fix a dripping tap, you’ll need a few basic tools and materials that are readily available at most hardware stores. These include an adjustable wrench, screwdrivers (both flathead and Phillips), pliers, a cloth or rag, plumber’s tape, replacement washers, O-rings, and valve seats. Additionally, it’s helpful to have a bucket or basin on hand to catch any water that may leak during the repair process. Before starting any work, be sure to turn off the water supply to the tap to prevent further leakage and minimize mess.
Identifying the Cause of the Drip
The first step in fixing a dripping tap is to identify the underlying cause of the leak. In many cases, a worn-out washer or O-ring is to blame for the drip. To determine which component is faulty, carefully disassemble the tap using your tools, taking care to keep track of the order in which the parts are removed. Once the tap is disassembled, inspect the washer and O-ring for signs of wear, such as cracks, tears, or deformation. If either component appears damaged or deteriorated, it will need to be replaced to stop the drip.
Replacing the Washer
If the washer is the culprit behind the dripping tap, replacing it is a relatively simple fix. Start by shutting off the water supply to the tap and removing the handle using a screwdriver. Once the handle is removed, use an adjustable wrench to loosen the packing nut and remove the valve stem from the tap body. Carefully remove the old washer from the end of the valve stem and replace it with a new one of the same size and type. Be sure to apply plumber’s tape to the threads of the valve stem before reassembling the tap to prevent leaks.
Replacing the O-Ring
If the O-ring is causing the tap to drip, it will need to be replaced to restore proper functionality. To access the O-ring, disassemble the tap as described earlier, taking care to remove the spout and any additional components blocking access to the O-ring. Once the O-ring is exposed, carefully remove it from its groove using a flathead screwdriver or utility knife. Take note of the size and type of O-ring so that you can purchase a suitable replacement. Install the new O-ring in the same position as the old one, ensuring a snug fit within the groove.
Replacing the Valve Seat
In some cases, a worn or damaged valve seat may be the cause of a dripping tap. The valve seat is the component inside the tap body that the washer presses against to form a watertight seal. If the valve seat is corroded or pitted, it may prevent the washer from sealing properly, resulting in a leak. To replace the valve seat, you’ll need a specialized tool called a valve seat wrench, which is designed to fit into the tap body and remove the old seat. Once the old seat is removed, install a new one of the same size and type, ensuring a tight seal to prevent leaks.
Reassembling and Testing the Tap
Once you’ve replaced the faulty components, carefully reassemble the tap in the reverse order of disassembly, taking care to tighten all connections securely. Turn the water supply back on and slowly open the tap to check for leaks. If the drip persists, double-check that all components are properly installed and seated. In some cases, tightening the packing nut or handle assembly may be necessary to achieve a watertight seal. Once you’ve confirmed that the leak has been resolved, pat yourself on the back for a job well done!
Conclusion
Fixing a dripping tap is a manageable DIY task that can save you time, money, and frustration in the long run. By understanding the basic anatomy of a tap and familiarizing yourself with common repair techniques, you can quickly diagnose and resolve common tap issues without the need for professional assistance. Remember to turn off the water supply before starting any work and use the appropriate tools and materials for the job. With a little patience and perseverance, you’ll have your tap dripping-free in no time, allowing you to enjoy a more efficient and leak-free plumbing system in your home.


