Sending an email with errors or to the wrong recipient can be a source of embarrassment and frustration. Fortunately, Microsoft Outlook offers a feature that allows users to recall emails sent in error, provided certain conditions are met. Whether you’ve mistakenly attached the wrong file, forgotten to include important information, or sent a message to the wrong recipient, recalling an email in Outlook can help mitigate the situation and prevent potential consequences. In this comprehensive guide, we’ll explore the steps involved in recalling an email in Outlook, as well as tips for minimizing the likelihood of needing to recall messages in the future. With a better understanding of this feature, you can navigate the world of email communication with confidence and ease.
Understanding Email Recall in Outlook
Email recall is a feature available in Microsoft Outlook that allows users to retract and replace messages that have been sent to recipients within the same organization. It’s important to note that email recall may not always be successful, particularly if the recipient has already opened or acted upon the message. Additionally, email recall is only available for users who are part of an Exchange Server environment and have certain permissions enabled. If you’re unsure whether your organization supports email recall, check with your IT department or system administrator for clarification.
Steps to Recall an Email in Outlook
Recalling an email in Outlook involves several steps, and it’s essential to act quickly to increase the chances of success. Here’s a step-by-step guide to recalling an email in Outlook:
Open Outlook: Launch the Outlook application on your computer and navigate to the “Sent Items” folder.
Open the Sent Email: Locate the email you wish to recall in the “Sent Items” folder and double-click to open it in a new window.
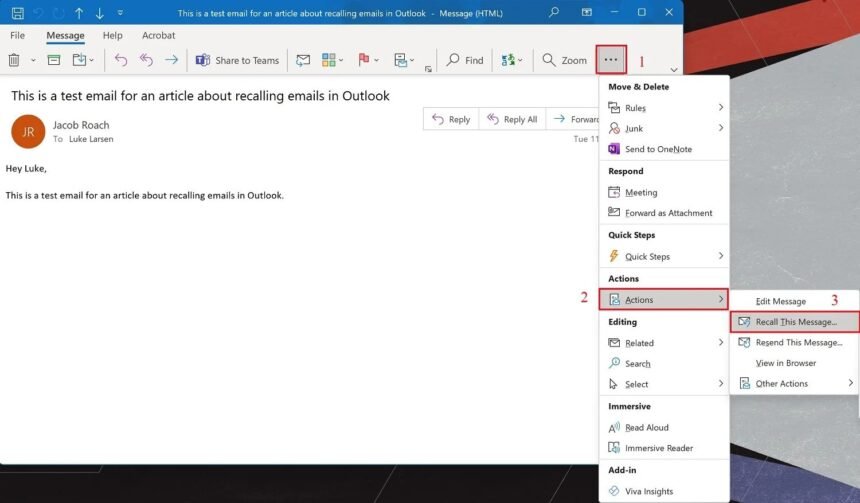
Select the Recall Option: With the email open, navigate to the “Message” tab on the ribbon at the top of the window. Click on the “Actions” dropdown menu, and select “Recall This Message.”
Choose Recall Options: In the “Recall This Message” dialog box that appears, you’ll have two options:
- Delete unread copies of this message: This option will attempt to delete the email from the recipient’s inbox before they have a chance to open it.
- Delete unread copies and replace with a new message: This option allows you to replace the original email with a corrected version.
Confirm Recall: Select your desired recall option and click “OK” to confirm. If you chose to replace the email with a new message, compose and send the corrected version before clicking “OK.”
Monitor Recall Status: Outlook will attempt to recall the email according to your chosen options. You can monitor the status of the recall by checking the “Tracking” tab in the original email’s properties.
Tips for Successful Email Recall
While email recall can be a useful feature in certain situations, it’s not foolproof, and success is not guaranteed. Here are some tips to increase the likelihood of successfully recalling an email in Outlook:
- Act quickly: Recall attempts are most effective when initiated shortly after sending the email. Once the recipient has opened or acted upon the message, recall becomes much less likely to succeed.
- Verify recipient status: Before attempting to recall an email, check the recipient’s status to see if they have read or acted upon the message. Outlook will indicate whether the email is still unread or has been opened by the recipient.
- Use discretion: Consider the urgency and importance of the situation before attempting to recall an email. In some cases, it may be better to send a follow-up message with any necessary corrections or clarifications rather than attempting to recall the original email.
- Enable message confirmation: To receive notifications when emails are successfully delivered or opened, enable message confirmation settings in Outlook. This can help you gauge the effectiveness of your recall attempts and take appropriate action if necessary.
Preventing the Need for Email Recall
While email recall can help rectify mistakes after they occur, taking proactive measures to prevent errors in the first place is always preferable. Here are some tips for minimizing the need to recall emails in Outlook:
- Double-check recipients: Before sending any email, carefully review the recipient list to ensure that you’re sending the message to the intended recipients.
- Review attachments and content: Take a moment to review any attachments or content included in the email to ensure accuracy and completeness.
- Use delay delivery: Consider using the delay delivery feature in Outlook to schedule emails to be sent at a later time. This allows you to review messages one final time before they’re sent and make any necessary changes or corrections.
- Utilize spell check: Enable spell check in Outlook to catch any spelling or grammatical errors before sending emails. This can help improve the professionalism and clarity of your communications.
Conclusion
Recalling an email in Outlook can be a lifesaver when mistakes happen, but it’s essential to understand the limitations and best practices associated with this feature. By following the steps outlined in this guide and implementing proactive strategies to minimize errors, you can navigate the world of email communication with confidence and ease. Whether you’re sending important work-related messages or casual correspondence with friends and family, knowing how to recall emails in Outlook effectively can help you maintain professionalism and avoid unnecessary complications.


