In an era where digital transactions are becoming increasingly predominant, the art of writing a check might seem a bit archaic. However, checks remain a vital financial tool for many, providing a secure and documented way of making payments. Whether it’s paying rent, settling bills, or transferring money, knowing how to write a check is an essential skill. This guide will walk you through the process step by step, ensuring that your checks are correctly filled out and processed without any hitches.
Understanding the Importance of Checks
Checks serve as a formal agreement between the payer and the payee, offering a level of security and traceability that many electronic payments struggle to match. They come with legal implications, ensuring that funds are transferred as intended and providing a paper trail that can be invaluable for financial management and dispute resolution. Despite their somewhat dated perception, checks remain prevalent in many financial transactions, especially in business settings and among individuals who prefer traditional banking methods.
Step-by-Step Guide to Writing a Check
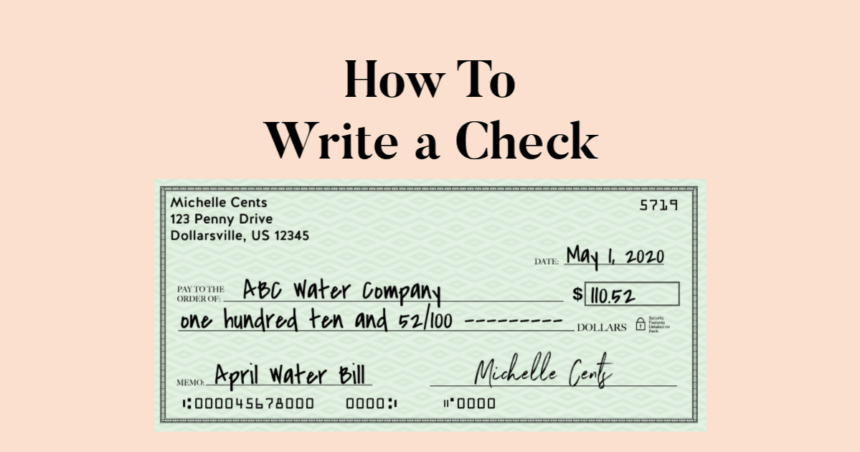
Writing a check involves filling out several fields on the check itself. Each part plays a crucial role in ensuring the check is valid and will be accepted by banks. Here’s what you need to know:
1. Date the Check
At the top right corner of the check, you’ll find a space to enter the date. This is crucial, as it indicates when the check was written. You can postdate a check by writing a future date, but this doesn’t guarantee the bank won’t cash it before then. It’s generally best to use the current date to avoid any confusion.
2. Write the Payee’s Name
On the line that starts with “Pay to the order of,” write the name of the individual or entity you’re paying. Be precise with spelling to avoid issues during the cashing or deposit process. If you’re unsure of the exact name, ask the payee for clarification. This ensures the check is directed to the right party.
3. Fill in the Amount in Numbers
Next to the dollar sign, write the amount of the check in numerical form. For example, $123.45. Be sure to write the amount as close to the dollar sign as possible to prevent fraud by adding extra numbers.
4. Write the Amount in Words
Below the payee line, there’s a line that typically ends with the word “DOLLARS.” Here, write out the amount of the check in words to match the numerical amount you’ve already filled in. For example, “One hundred twenty-three and 45/100.” Writing the amount in words adds an extra layer of security, confirming the intended amount of the transaction.
5. Add a Memo (Optional but Recommended)
The memo line at the bottom left of the check isn’t mandatory, but it’s helpful for noting the reason for the payment. This can assist both you and the payee in keeping track of payments for specific purposes, such as “Rent for April” or “Birthday Gift.”
6. Sign the Check
The signature line on the bottom right corner is perhaps the most critical part of the check. Your signature authorizes the payment and validates the check. Ensure your signature matches the one your bank has on file to prevent any issues with processing.
Common Mistakes to Avoid
When writing a check, attention to detail is paramount. Common pitfalls include:
- Misspelling the payee’s name: This can lead to the check being returned or rejected.
- Inconsistencies between written and numerical amounts: Banks will reference the written amount if there’s a discrepancy, which could lead to unintended payment amounts.
- Forgetting to sign the check: An unsigned check is invalid and will not be processed.
Conclusion
Writing a check is a straightforward process, but it requires attention to detail to ensure accuracy and validity. By following the steps outlined above, you can write checks confidently, knowing they will be accepted and processed smoothly. As digital transactions continue to evolve, the relevance of checks may wane, but their utility, security, and formality ensure they remain a cornerstone of financial transactions for the foreseeable future.
Read Also: How to Get Rid of Gnats


